|
| Compiling and Debugging SBUML |
Doing the Compile Steps Manually
SBUML is an extention of UML, so everything on the UML Project's page about compilation applies: http://user-mode-linux.sourceforge.net/compile.html
To compile SBUML binary, follow the instructions on the UML compile page, adding one step to apply the SBUML patch.
- Download and untar the Linux kernel source.
- Apply the UML patch.
- (new step) Apply the SBUML patch.
- make xconfig ARCH=um
- make linux ARCH=um
For step 4, be sure that CONFIG_UML_REAL_TIME_CLOCK is not set.
The SBUML patch can be found at the sourceforge download page: Kernel Patches
|
Compilation Factors that Affect Compatibility
One version of the SBUML binary can restore snapshots from a different SBUML binary. For example, the binary in sbuml-core-2423-2um-1sb-060904b.tar.gz can restore snapshots from the sbumldemo from last year, even though one is running Linux 2.4.23 and the other is running Linux 2.4.18. Both of these binaries were compiled in RedHat 7.2. If the 2423-2um-1sb binary were compiled in RedHat 8.0, for example, the compatibility would be broken.
Furthermore, a 2423-2um-1sb binary compiled in RedHat 8.0 will not restore a snapshot from the exact same source compiled in RedHat 7.2. Until the exact reasons are understood, which may be as simple as compiler and glib versions, the easiest way to insure compatibility for publicly published snapshots is to compile the binary in RedHat 7.2. Of course, for just debugging SBUML or experimenting with the source code, any environment that compiles UML will do fine.
Also, as mentioned above, it is important to turn off CONFIG_UML_REAL_TIME_CLOCK. The reason is that this feature will make snapshots that are restored on different hardware hang.
On a related note, even if the binary used to build the snapshot is not compatible, it is possible to put a copy of the binary itself inside the tar file inside the snapshot directory. The SBUML scripts will use this binary by default instead of the binary on the user's machine. This makes the snapshot larger, but provides some assurance for future compatibility.
|
An SBUML Snapshot for Automatically Compiling SBUML
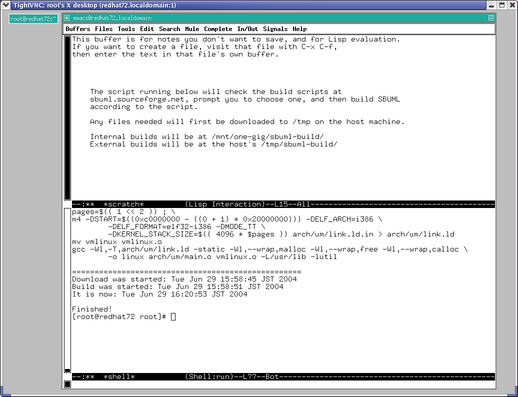
For people who want to have a convenient way to compile SBUML using RedHat 7.2 tools, the following snapshot can help. To use it, simply click on the screenshot below and choose one of the build scripts after the snapshot is restored. Choosing an external build will place the Linux source tree on the host at /tmp/sbuml-build. If that directory already exists, a prompt will appear to ask if the existing directory can be deleted first. So all in all, SBUML can be compiled with one mouse click and 2 to 4 key presses, plus the wait for download (20 minutes?) and compile (25 minutes?).
Note that the snapshot will cache all the necessary source file in the host's /tmp directory. Therefore, you can jumpstart the process (and be kind to the www.kernel.org server) by first placing a copy of linux-2.4.23.tar.bz2 in the host's /tmp directory.

(18MB delta from twm-1024x768(11M)/twm-800x600(3M)/rh72c-32m(6M)/test1(7M)) :
RedHat 7.2 ready to automatically download and compile SBUML.
|
Debugging from the Automatic Build
Once the SBUML snapshot has build the kernel binary externally at /tmp/sbuml-builds/, it is easy to have the SBUML scripts point to it. Simply put a full path to the binary as the first parameter to the sbumlinitdemo command:
$ ./sbumlinitdemo /tmp/sbuml-build/linux-2.4.23/linux
The sbumlboot command takes a "-debug" parameter, so the following will pass the "debug" parameter to the UML command line, which will start up the gdb debugger in the normal UML way.
[(sbumldemo subshell) sbumldemo]$ sbumlboot m -debug
Then, the full power of the gdb debugger and User-Mode Linux are available for debugging and exploring SBUML, UML, and the Linux kernel. For a simple demo, here is a sequence of gdb commands that will break on every process switch and output the process number of the outgoing process:
(gdb) br _switch_to

Note: breakpoint 4 also set at pc 0xa00bdcba.

Breakpoint 5 at 0xa00bdcba: file process_kern.c, line 197.

(gdb) command

Type commands for when breakpoint 5 is hit, one per line.

End with a line saying just "end".

>p ((struct task_struct *) get_current())->pid

>cont

>end

(gdb) set height 0

(gdb) c
|
Checking that a Kernel Build Matches an Existing Snapshot
Debugging restored snapshots is a bit more complicated. None of the restore commands (sbumlquick, sbumlrestore, and sbumlresume) take a "-debug" parameter yet. Basically, it is necessary to attach gdb to the tracing thread, control thread, and other processes after the fact using the "-p" parameter to gdb or using the "attach pid" gdb command. This page at the UML site has some good hints.
But before any of this is possible, you must first have a build that matches the binary used in the snapshot and also know some of the process IDs.
The process IDs are easy: Just type in, for example sbumlstatus m1 and one of the output lines will look like this:
Main PIDs: 1997 2003
The first PID is the tracing thread, and the second is the control thread.
For verifying that the binary matches the source tree, the vm-1 file in the machine directory can give a good indication because it contains the compiled kernel code. Assume that two machines are running. "m1" is one that has been restored from a snapshot. "m2" is a machine that was freshly booted from a binary that freshly compiled. Now do the following:
[(sbumldemo subshell) sbumldemo]$ xxd machines/m1/vm-1 >m1-hex

[(sbumldemo subshell) sbumldemo]$ xxd machines/m2/vm-1 >m2-hex

[(sbumldemo subshell) sbumldemo]$ diff m1-hex m2-hex >d-hex

[(sbumldemo subshell) sbumldemo]$ more d-hex
If d-hex is only a few lines containing only the compilation dates, then you know the binaries match and the symbols in the binary you just compiled have a good chance of matching the binary that was loaded into vm-1 from the snapshot.
|

|
|
|